Summary: Golf cart solenoids are electromagnetic switches that control power flow from the battery pack to the motor. When they fail, the cart clicks but won’t move, loses power mid-ride, or won’t respond at all. This guide covers how to test a solenoid with a multimeter, common failure symptoms by golf cart brand (Club Car DS, EZGO TXT, and Yamaha G-series are the most frequent offenders), step-by-step repair tips, and when to call in professional help. Resort Life Carts provides golf cart repair services in Madera, California and surrounding areas including Fresno, Clovis, Chowchilla, and Los Banos.
If your golf cart clicks when you press the pedal but won’t move, you’re probably dealing with a bad solenoid. It’s one of the most common repairs in the industry and also one of the most misdiagnosed. A lot of people chase the batteries or the controller when the solenoid was the culprit all along. This guide is going to walk you through exactly how to test it, what failure looks like across different cart models, and when it’s time to stop wrench-turning and call someone who does this for a living.
What a Solenoid Actually Does
A solenoid is an electromagnetic switch. On a golf cart, it sits between your battery pack and your motor controller, and its job is to close a high-current circuit when you press the accelerator pedal. When you press the pedal, a small control voltage (usually 12V or 36V depending on the cart) energizes the solenoid coil. That coil pulls in a heavy plunger that bridges two large copper contacts, which completes the main power circuit and sends current to the motor.
When it’s working, you’ll hear a solid “click” the moment you press the pedal, and the cart takes off. When it’s failing, you get a weak click, a rapid clicking, no click at all, or the cart moves erratically. The solenoid lives a hard life. It’s switching full battery voltage under load, thousands of times a season, often in heat and humidity. They wear out. The copper contacts pit and burn, the coil degrades, and eventually the plunger stops seating cleanly.
Which Golf Carts Have Solenoid Problems Most Often
Not all carts are equal here. Some brands and model years see this problem constantly.
Club Car DS (1995 to 2005 gas and electric) is probably the single most common cart we see with solenoid issues. The OEM solenoids on these are not particularly robust, and a lot of the aftermarket replacements floating around online are low-grade. The 36V DS in particular tends to burn through solenoids faster because the contacts see more current stress over time as the battery pack degrades. If you’re running an older DS on a marginal battery pack, you’re shortening solenoid life with every ride.
EZGO TXT (36V, 1996 to 2009) is a close second. The TXT uses a relatively simple solenoid design and they’re inexpensive to replace, but they fail often because of water intrusion and corrosion. EZGO mounted the solenoid in a location that gets splashed constantly, and unless the cart has been well maintained, you’ll find the terminals corroded beyond what can be cleaned.
Yamaha G-series (G2, G8, G9, G14, G16, G22) gas carts show up a lot too, but for a different reason. The Yamaha gas cart solenoid works differently from electric cart solenoids. It’s part of the starter/choke circuit, and when it goes bad the cart won’t start or cranks weakly. A lot of techs confuse this with a starter motor problem and replace the wrong part.
Club Car Precedent 48V models from the mid-2000s are seeing increasing solenoid failures now simply because they’re aging. The 48V system puts more stress on the solenoid contacts and when battery connections are even slightly loose, the solenoid pays the price through arcing.
Older Columbia Par Car carts and some of the late-model Star EV fleet carts also show up, but less frequently. If you’re running a fleet in Madera or Fresno, Club Car and EZGO are statistically what you’re going to be chasing most.
Symptoms of a Bad Solenoid
Here’s what to look and listen for:
Single loud click with no movement. This is the classic. The solenoid is engaging (the coil is working) but the contacts aren’t completing the circuit. The plunger is pulling in but the contacts are burned or pitted to the point where resistance across them is too high to pass usable current.
Rapid clicking. This usually means the coil is getting voltage but not enough to hold the plunger in. Low battery voltage is the most common cause here, but a failing coil inside the solenoid can do the same thing. Don’t replace the solenoid until you’ve verified battery voltage under load.
No click at all. Either the coil is open (dead solenoid), the control circuit isn’t sending voltage to the coil, or there’s a wiring problem upstream. This requires more diagnostic work before you condemn the solenoid.
Cart moves but loses power and then clicks. The contacts are intermittently failing under load. As the cart draws heavy current (going uphill, full load of passengers), the contacts heat up and resistance increases, the cart bogs, and eventually the solenoid stops conducting. It might work again after it cools. This one leads people to blame the batteries, but load-test the solenoid before you go down that road.
Burning smell near the battery compartment. If the solenoid contacts are arcing badly, you’ll sometimes smell it. This is also a fire risk and needs to be addressed immediately.
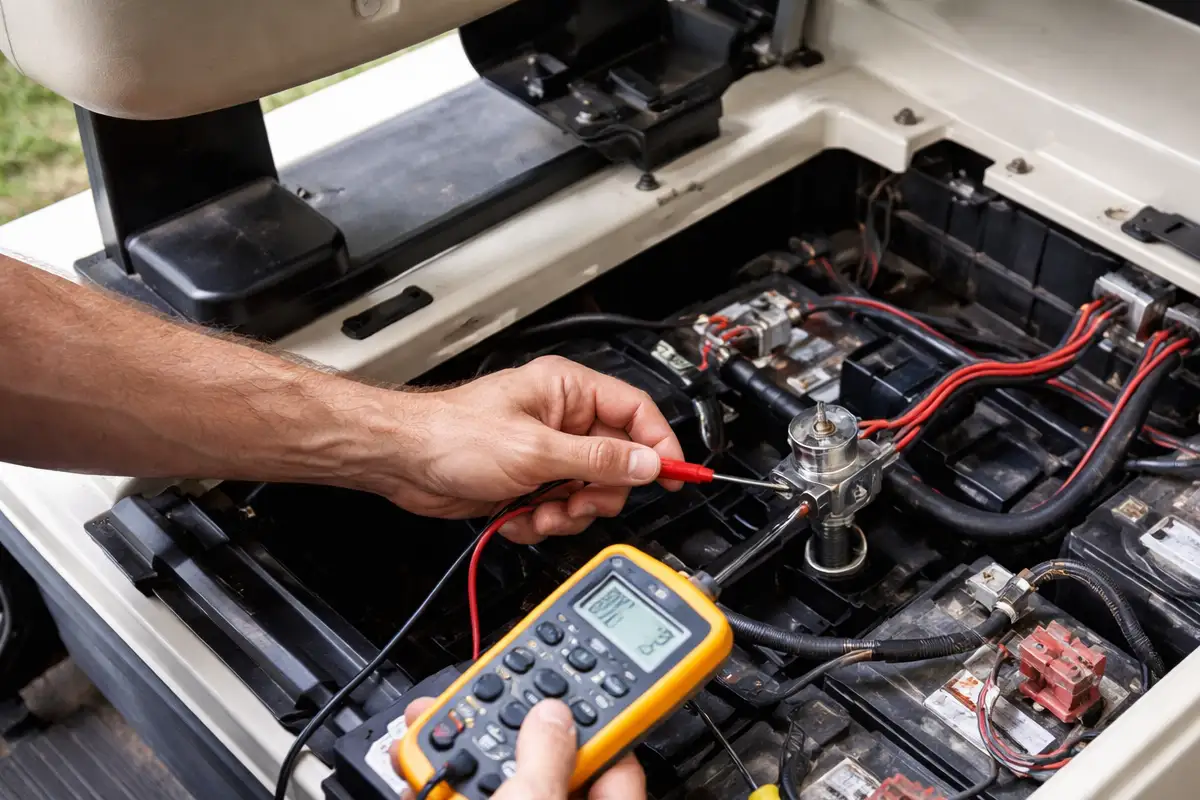
How to Test a Solenoid
You need a digital multimeter for this. Don’t skip the testing and just throw a new solenoid at it. Solenoids are cheap, but the problem might be upstream and you’ll end up with the same symptom.
Step 1: Verify battery voltage. Before you touch the solenoid, check your battery pack voltage. A 36V pack should read 38V or higher at rest. A 48V pack should read 50V or higher. If you’re significantly under those numbers, address the batteries first. A weak pack will make a perfectly good solenoid click but fail to hold.
Step 2: Check the large terminal voltage. With the key off and the cart in neutral, put your multimeter leads on the two large (motor-side) terminals of the solenoid. You should read full battery voltage. If you’re reading zero or significantly low, you’ve got a wiring problem between the battery pack and the solenoid, not a solenoid problem.
Step 3: Activate the solenoid and check the coil. On the two small terminals (the control wire terminals), you should see your control voltage the moment you press the accelerator. When working on a 36V cart, that’s typically 12V or 36V depending on how the control circuit is wired. On a 48V cart, it varies by brand. If you’re not getting control voltage to the coil, trace back to the controller, the key switch, or the forward/reverse switch. One of them is the problem.
Step 4: Test voltage drop across the contacts. This is the definitive test. Press the accelerator (with someone helping or by using a jumper on the control terminals) and measure DC voltage across the two large terminals while the solenoid is engaged. A good solenoid will show 0.0V to 0.1V. If you’re reading 0.5V or higher, the contacts are failing and resistance is building up. Anything above 1V and the solenoid needs to be replaced.
Step 5: Continuity test (key off, coil disconnected). With the cart completely off and the control wires removed, test continuity across the coil terminals (small terminals). A healthy coil will show resistance in the range of 1 to 20 ohms depending on the cart. An open reading means the coil is dead.
Replacing the Solenoid
This is a job most cart owners can handle if they’re comfortable with basic electrical work, but respect the battery voltage. On a 48V system, a dead short across the terminals will weld your wrench to the cart and potentially cause serious injury. Use insulated tools and disconnect the negative battery cable before starting.
The basic process is the same on most carts. Label or photograph every wire before you remove anything. The large terminals connect to battery positive and motor positive respectively. The small terminals connect to the control circuit. Match gauge to gauge when you reconnect. If the replacement solenoid has a slightly different terminal layout, refer to your wiring diagram.
One thing that trips people up: solenoid polarity on the large terminals. On some carts it doesn’t matter, on others it does. Check your service manual. On Club Car DS carts especially, reversing the large terminals can cause the cart to run in the wrong direction or trip the controller into fault mode.
Use OEM or OEM-equivalent solenoids. The $12 solenoids on Amazon are not worth it. They fail in one season, the contacts are thin, and the coil resistance is often out of spec. Spend the extra money on a Albright, Cole Hersee, or genuine Club Car/EZGO part.
When to Stop DIYing and Call a Tech
If you’ve tested the solenoid and it’s good, but the cart still won’t move, you’re now into controller territory or wiring harness diagnosis. Controller testing requires more specialized equipment, and misdiagnosing a controller can cost you $400+ in parts if you replace the wrong thing. That’s when it makes sense to bring it to someone with the right tools.
Our golf cart repair services in Madera, California cover everything from solenoid replacement and battery pack testing to full controller rebuilds and motor rewinding. We service customers throughout Madera County and surrounding areas including Fresno, Clovis, Chowchilla, Los Banos, Merced, and the San Joaquin Valley communities. If you’re not sure whether your problem is the solenoid, the controller, or the batteries, bring it in and we’ll run a full electrical diagnostic before recommending any parts.
Sometimes the repair bill surprises people and they start wondering if they’d be better off with a newer cart. If you’re staring down a controller replacement on a 2004 DS, that’s worth thinking about. We do keep a selection of new golf carts for sale if you want to see what’s currently in stock and compare what a new cart costs versus continuing to repair an older one.
Golf Cart Solenoid FAQ
Test your battery pack voltage under load first. If voltage holds above the rated minimum while you press the accelerator, the batteries are probably fine and the solenoid is the more likely culprit. If voltage drops significantly under load, the batteries are starving the solenoid. A voltage drop test across the solenoid contacts (as described above) will confirm whether the solenoid itself is failing.
Yes, it can. A solenoid that is failing to fully open can allow a small amount of current to continuously flow through the circuit, creating a parasitic draw. More commonly, a solenoid with welded contacts (contacts stuck closed) will keep the circuit live even when the cart is off, which will drain your batteries completely overnight. If your batteries are dying faster than expected, check whether the solenoid is releasing properly after you take your foot off the pedal.
The click tells you the solenoid coil is receiving voltage and the plunger is engaging. The fact that the cart doesn’t move means the contacts inside are not completing the circuit with enough conductivity to pass current to the motor. This is almost always burned or pitted contacts inside the solenoid. Occasionally it can be an open circuit between the solenoid and the motor, so trace the wiring before replacing parts.
It depends heavily on battery pack condition and how the cart is used. A cart on a healthy, properly maintained battery pack in light residential use can get 5 to 8 years out of a quality solenoid. A fleet cart running 8 hours a day on an aging battery pack might burn through a solenoid in 18 months. Keeping battery connections clean and tight is the single biggest factor in solenoid longevity.
Club Car DS models from the late 1990s and early 2000s are the most common, followed by EZGO TXT models from the same era. Yamaha G-series gas carts have a different type of solenoid failure related to the starter circuit. Older carts with degraded battery packs across any brand will stress solenoids harder and fail them sooner.
Temporarily, yes, but only if you know exactly what you’re doing and understand the safety risk. Bypassing the solenoid removes the protection it provides against accidental engagement. Do not do this on a 48V cart unless you are experienced with high-voltage electrical systems. A safer approach is to do the voltage drop test described in this guide, which will tell you definitively whether the solenoid contacts are the problem without bypassing any safety systems.
The solenoid itself runs anywhere from $25 to $90 depending on brand and voltage. Labor is typically one to two hours at shop rates. If you’re in the Madera or Fresno area and want a professional diagnosis and repair, contact Resort Life Carts for current pricing on our golf cart repair services.
If a new solenoid didn’t fix the problem, the issue is either in the wiring (a corroded connection between the solenoid and the motor, or a broken wire in the harness), the motor controller, or the motor itself. The controller is the next most common cause. A proper diagnostic with a cart-specific scan tool or controller test procedure is the right next step.
Resort Life Carts Golf Cart Service Center
- 10740 CA-41, Madera, CA 93636
- (559) 831-1971 (ext 104)